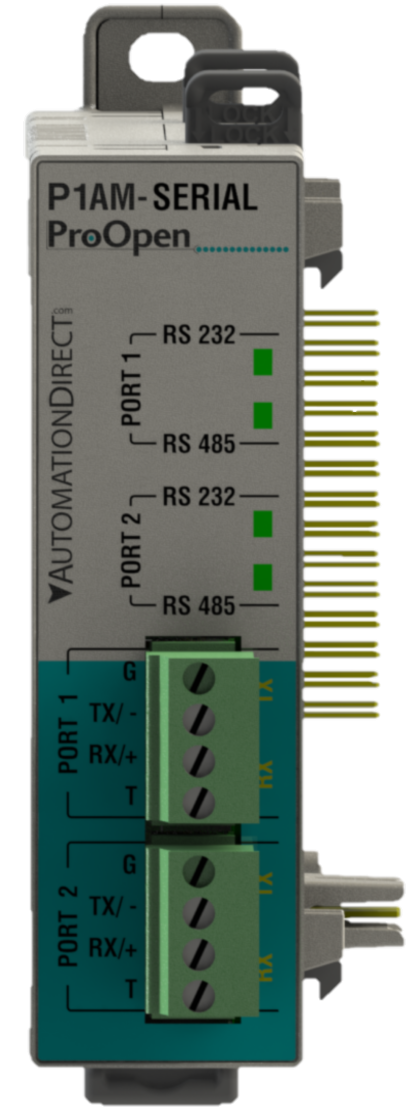
The P1AM-SERIAL is an industrial rated shield that provides two serial interfaces individually configurable
for RS232 or RS485.
The P1AM-SERIAL is ideal for communicating with RS232 and RS485 devices using custom protocols as well as Modbus RTU, DMX, and other serial based communications.
PORT1_RS232_BEGIN(115200);
                        Port1.println("Hello Port 1!");
General Usage
- PORT1_RS485_BEGIN()
- PORT1_RS232_BEGIN()
- PORT2_RS485_BEGIN()
- PORT2_RS232_BEGIN()
The code snippets below require the P1AM_Serial library. Use of the P1AM-Serial library requires version 1.6.21 or greater of the P1AM-100 in the Arduino boards manager.
When using the P1AM Serial with a custom protocol, i.e. writing data directly to the port, use the function below that corresponds to the port and mode you are using to configure the port. Baudrate and other settings can be configured the same way as the standard Arduino Serial library. For a list of all configuration options click here.
Once the port is configured, use the Port1 and Port2 objects to interact with the ports.
// Configure both ports for RS485 at 9600 baud, 8 data bits, no parity, 1 stop bit
                        PORT1_RS485_BEGIN(9600, SERIAL_8N1);
                        PORT2_RS485_BEGIN(9600);// 8N1 is the default setting

                        // Start RS485 transmission
                        Port1.beginTransmission();
                        Port2.beginTransmission();

                        // Use Port1 and Port2 to write to the ports
                        Port1.write("Hello World 1\r\n");
                        Port2.write("Hello World 2\r\n");
Additionally, you can use the standard Serial1 and Serial2 objects to interact with the ports, however when doing so
you cannot use any RS485 functions such as beginTransmission() or endTransmission().
// Configure both ports for RS232 at 115200 baud, 8 data bits, even parity, 1 stop bit
                        PORT1_RS232_BEGIN(115200, SERIAL_8E1);
                        PORT2_RS232_BEGIN(115200, SERIAL_8E1);

                        // RS232 does not require beginTransmission()

                        // Use Serial1 and Serial2 to write to the ports
                        Serial1.write("Hello World 1\r\n");
                        Serial2.write("Hello World 2\r\n");
When using the P1AM Serial with a library that has its own begin() function, i.e. ArduinoModbus,
manually configure the mode of the ports with serial_port_config() before calling
the library's begin() function.
#include <ArduinoRS485.h>
                        #include <ArduinoModbus.h>
                        #include <P1AM_Serial.h>

                        ModbusRTUClientClass rtu_client(Port1); // Create modbus client on port 1

                        void setup() {

                             serial_port_config(1, RS232_MODE); // Set port 1 to RS232 prior to starting modbus client

                             rtu_client.begin(115200); // Start modbus client on port 1
                        }
The mode of the P1AM-SERIAL can be easily configured using the helpers library for the CPU
UART port setting options can be referenced here.
Note: The Busio.UART rs485_dir and rs485_invert options are not used.
The rs485_wrapper library will handle all supported RS485 operations.
RS485 communications use the rs485_wrapper library to automatically control transmit and receive modes.
Arduino Library: P1AM_Serial
CircuitPython Libraries:
CircuitPython_rs485_wrapper
busio.UART
Power Budget: 115mA / 3.3V
Additional Resources:
Data Sheet
P1AM-SERIAL on AutomationDirect.com
| Pin | Port | Function |
|---|---|---|
| 14 | Port 1 | TX |
| 13 | Port 1 | RX |
| A6 | Port 1 | RS485 DE/RE |
| 3 | Port 1 | RS232/RS485 Select |
| 0 | Port 2 | TX |
| 1 | Port 2 | RX |
| 6 | Port 2 | RS485 DE/RE |
| 2 | Port 2 | RS232/RS485 Select |